
Modern Accent Wall
- Meghann Hestwood

- Jul 31, 2020
- 2 min read
Learn how to create a modern accent wall with only a few tools and these simple instructions.

We created this simple accent wall without much of a plan and it only took us a few hours (broken apart in two days to allow time for drying time). You can make yours however you want in just a few steps. Take a look at our instructions and supplies list below. Please note, there are several ways to create this look, so customize however you want!
Before:
Here's a before photo of the wall:

Supplies Needed:
1/4 inch x 1 - 1 1/2 inch lattice (you can also use MDF board for a fraction of the price)
Miter or table saw
Level
Nail gun/nails (18g brad nails)
Wood filler
Paint and brushes (or sprayer)
Paintable caulk (optional)
Instructions:
1. Purchase any needed supplies.
2. Setup your room.
Get all your supplies in one area. We found it easiest to bring the saw and other supplies to the room we were working in which saved time going back and forth to make the cuts. I covered all the furniture with old sheets so I wouldn't have dust all over from the saw.
3. Think through (or talk through) your vision.
Think through (and communicate if you're working with a partner) where you may want your boards and if you want a more abstract or structured look.
4. Measure and cut your first board.
I started with a vertical board about 1/3 of the way through the room to start. To determine the height, I measured from the bottom of the crown molding to the top of the trim.
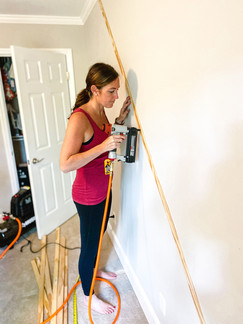
5. Mount your first board.
I placed my board on the wall where I wanted it and made sure it was level. From there, I used the nail gun to stick it to the wall. Note, the amount of nails you use will determine if you'll need to use caulk later on.

6. Cut and mount additional boards.
We took it one board at a time to see where we wanted them to be placed and to play around with different patterns. This worked best for us.
Note, all angled cuts that we made were 45 degrees.
7. Fill nail holes with wood filler and sand.
Once your wood filler is dry, sand down any excess to prepare for paint.

8. Caulk seams (optional).
We did not end up using caulk in our seams because it was tight against the wall. However, if you see any gaps from your lattice/MDF boards then you'll want to use caulk to fill those seams.
9. Paint.
I don't currently have a good paint sprayer and was ready to get this wall done, so I simply taped off the adjoining walls/trim and painted with a brush and roller. However, if you have a paint sprayer, you can absolutely go that route.

10. Enjoy!
This is always my favorite part of a project and for this one, it made the whole room feel complete!


Please let us know if you create your own and tag us on social media using @hestwoodandco


Comments